Photo EXIF Editor Guide, Episode 4: Batch Editing
Episode 4 of our video guide to Photo EXIF Editor is about editing many photos at once: selecting a folder, what Multiple values means, one change written to every photo, shifting a whole trip, large batches of hundreds or thousands of photos, and the permissions Android asks for along the way.
On this page
This is the fourth episode of The complete guide to Photo EXIF Editor, and the one that saves the most time. Everything you've learned so far on single photos, from dates to locations, works on many photos at once. This episode shows how to select them, what the batch editor shows, the one rule that makes batch editing safe, and how the app handles batches of hundreds or thousands of photos.
Watch the episode above, or read on.
Select the photos
Batch editing starts with a selection, and there are two ways to make one:
- The File Browser. Open a folder. Tick the check boxes of the photos you want, or tap Select all at the top to take the whole folder. The number of selected photos shows in the toolbar. Then tap Edit (the pencil).
- The Photos picker. Tap Photos on the home screen and pick several photos in Android's picker. They open in the same batch editor.
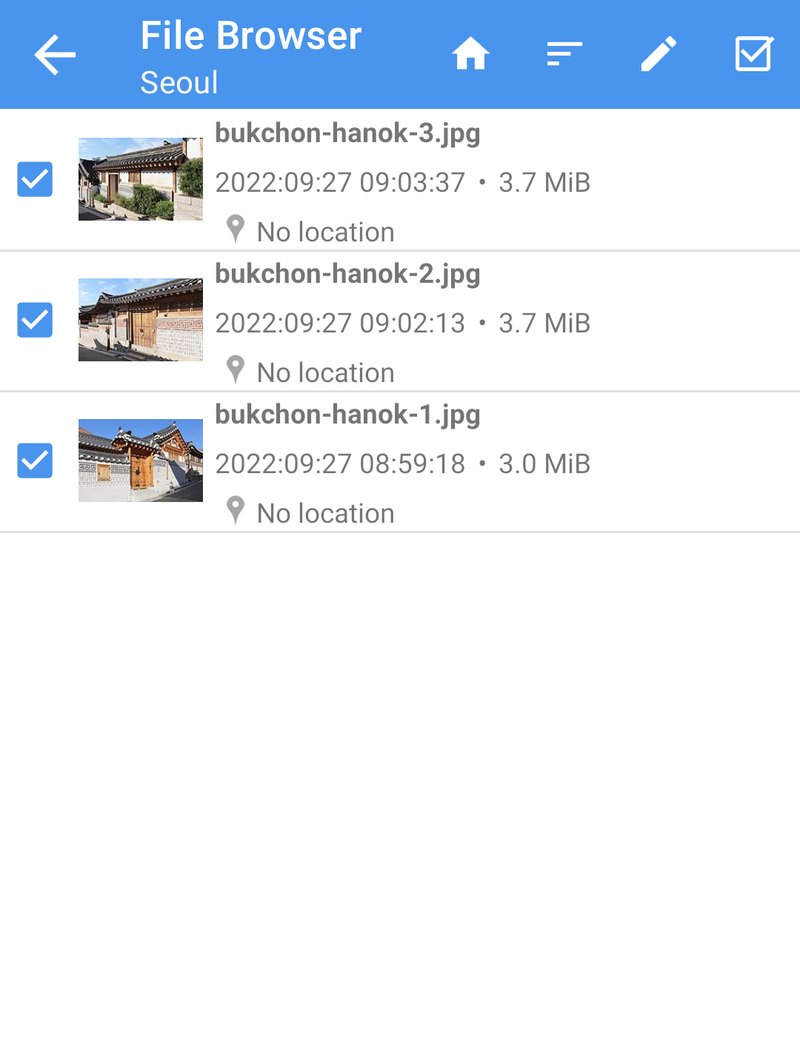
A folder from one trip or one event is the natural unit for a batch: it usually needs the same change, and it's easy to check afterwards. Sorting the folder by time first (the Sort button) helps you see what you're selecting.
Multiple values
The editor opens with all the selected photos. It looks like the single-photo editor, with one difference: fields that are the same in every photo show their value, and fields that differ between the photos show Multiple values.
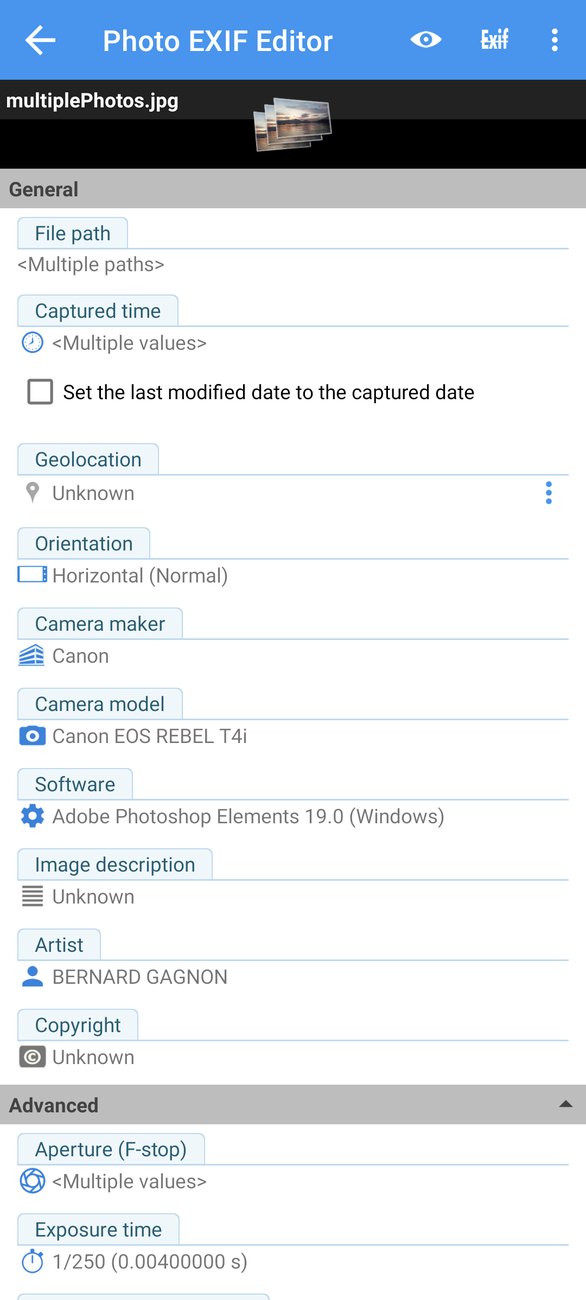
Here is the rule that makes batch editing safe:
When you change a field, the new value is written to every selected photo. Fields you don't touch keep each photo's own value, even when they differ.
So you can set one artist for a hundred photos without touching a single date, and shift a hundred dates without touching a single description. The app only writes what you changed.
One change, every photo
The simplest batch edit is a value that is true for every photo in the selection: your name, a copyright notice, the camera model for a camera that doesn't write it, a set of keywords for a shoot, or a location for everything taken at one place.
In the video we put a name and a copyright notice on a morning's photos from Seoul:
- Tap Artist and type the name.
- Tap Copyright and type the notice.
- Tap Save.
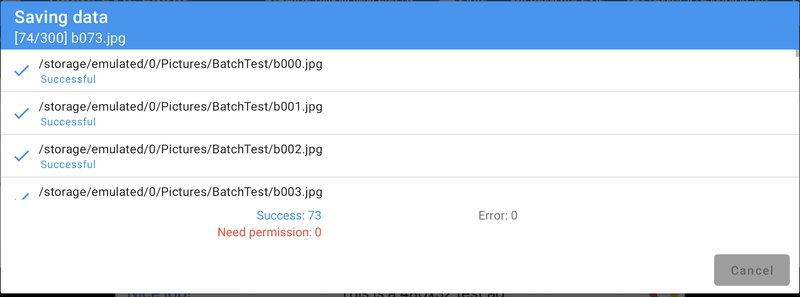
The saving window shows each photo as it's written and a running count. A few seconds later, every photo carries the name and the notice, and nothing else about them has changed.
The same works for every other field, including Geolocation (one location for everything from one place), the IPTC fields (Episode 5), and templates (Episode 6), which are a way to apply a whole set of values to a batch in one tap.
Shift a whole trip
This is the hero use of batch editing, and it's worth repeating from Episode 2. Imagine the camera's clock was one day ahead for a whole trip, or an hour behind because it never switched to summer time.
- Select the trip's photos and tap Edit.
- Tap Captured time, choose Shift by, and enter the amount: −1 day, or +1 hour.
- Confirm. Until you save, the field shows the shift you chose, for example Shift −1d.
- Save.
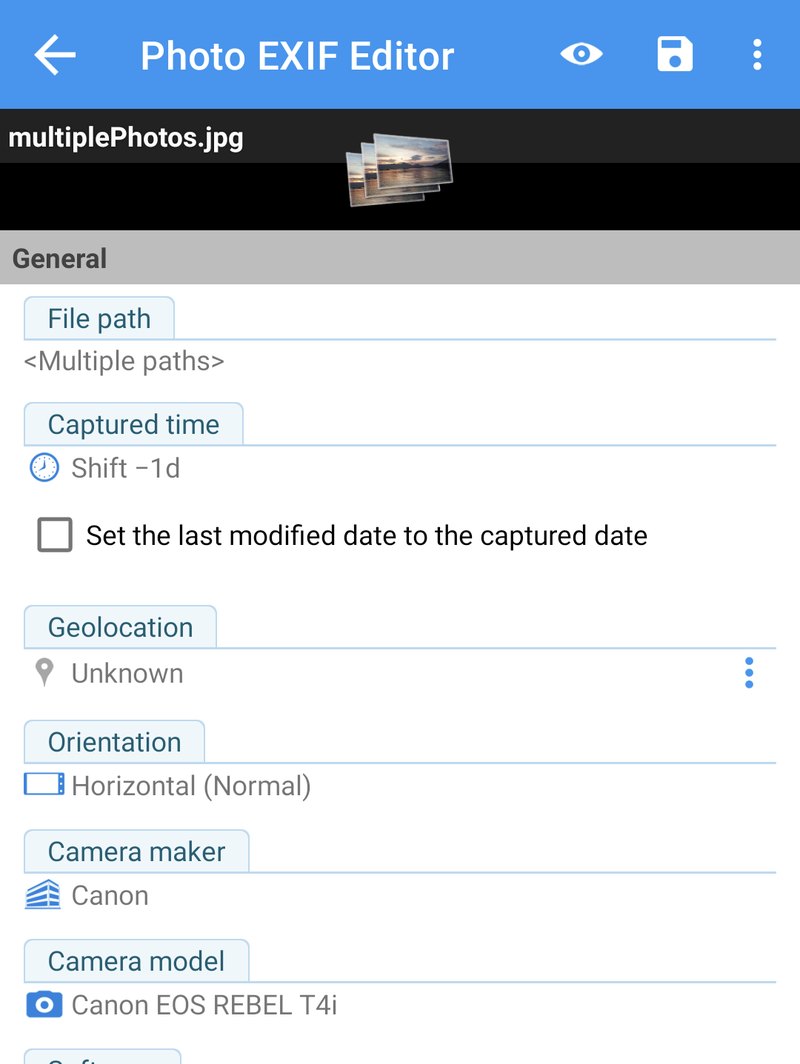
Each photo keeps its own time and moves by the same amount, so the order of the photos and the gaps between them stay exactly as they were. Photos without a captured date are left unchanged, because there's nothing to shift.
Set date in a batch does something different: it gives every selected photo the same date and time. That's right for a set of scans from one day, and wrong for a trip. When in doubt, use Shift by.
Large batches
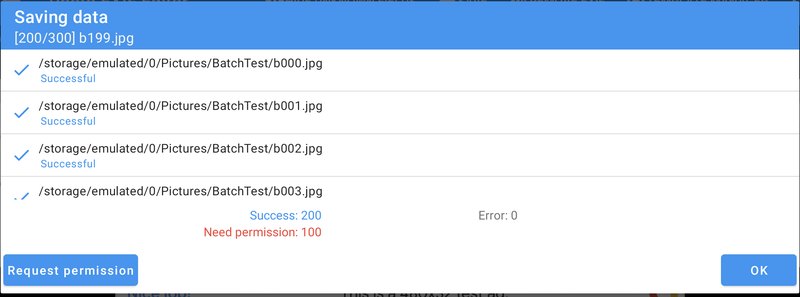
You can edit hundreds or even thousands of photos at once. Saving takes a moment per photo, and the saving window keeps you informed with a running count of:
- photos saved,
- photos that need your permission, and
- photos that failed (a file that was deleted or moved meanwhile, or a damaged file).
Need permission
Photos created by other apps, such as your camera app, belong to those apps as far as Android is concerned. If you haven't granted Manage media (Android 12 and later), Android asks you to allow the changes. In the saving window, those photos show Need permission, and the Request permission button opens Android's confirmation dialog for up to 2,000 photos at a time. Tap it again for the next group. Granting Manage media once, in the app's permissions, removes this step for good.
Keep going
While a large batch saves, you can switch apps or turn your screen off: saving continues in the background. The only things to avoid are uninstalling the app, and deleting or moving the photos while they're being written. Rotating the phone or coming back to the app later is fine.
What to batch, and what not to
A good batch is one change that is true for every photo in it:
- A shift is perfect: every photo moves by the same amount.
- Artist, copyright, keywords, a camera model are perfect when the same words are true for all of them.
- One location is perfect for everything taken at one place.
- Remove EXIF on a batch (Episode 8) is perfect before sharing a set of photos.
Be careful with:
- Set date in a batch, which gives every photo the same date and time. Use Shift by for a trip.
- A description in a batch, unless the photos really share one caption.
- Mixed folders, where photos from two cameras or two days need different changes. Split them first, or select only the photos that need the same change.
And, as always: try it on one photo first, check it in your gallery app, then do the rest. Keep a backup of irreplaceable photos; there is no undo after you save.
Recipes
Add your name and copyright to all your photos. Folder by folder: Select all, Edit, fill in Artist and Copyright (and the IPTC Creator and Copyright notice if you publish your photos), Save. Save the values as a template (Episode 6) and the next folder takes three taps.
Merge photos from two cameras into one timeline. Find a moment both cameras photographed, compare the two captured times, select one camera's folder, and Shift by the difference.
Geotag a day from a camera without GPS. Select the camera's photos from one place, Edit, tap Geolocation, search the place, confirm, Save. Repeat for the next place.
Clean a set of photos before sharing. Select them, Edit, tap Remove EXIF, tick Geolocation (and anything else you'd rather not share), Save.
What's next
In Episode 5: IPTC and the camera fields we fill in the fields that photo libraries and stock sites read, titles, keywords, creator and copyright, and decode the camera fields in the Advanced section: aperture, exposure time, ISO, focal length and the rest, in plain words.
The full series:
- Getting started
- Dates and times
- Locations and geotagging
- Batch editing (this episode)
- IPTC and the camera fields
- Templates and Copy EXIF
- The Photo map
- Privacy and the HEIC/AVIF converter
Get the app
- Photo EXIF Editor (free): https://play.google.com/store/apps/details?id=net.xnano.android.photoexifeditor
- Photo EXIF Editor Pro (no ads): https://play.google.com/store/apps/details?id=net.xnano.android.photoexifeditor.pro
The sample photos in this series are CC0 photos from Wikimedia Commons.
Videos
Related app
Photo EXIF Editor
View, edit and remove photo EXIF data and GPS location
Related posts
Photo EXIF Editor Guide, Episode 3: Locations and Geotagging
Episode 3 of our video guide to Photo EXIF Editor puts photos on the map: where a location lives inside a photo, adding one by searching a place or dropping a pin, placing a photo exactly on satellite view, copying a location from one photo to many, and removing a location before a photo goes online.
Photo EXIF Editor Guide, Episode 2: Dates and Times
Episode 2 of our video guide to Photo EXIF Editor fixes the most edited field of all: set an exact date for a scan that has none, shift a photo by an hour when the camera forgot summer time, shift a whole trip by a day in one go, keep file names and the file's own date in step, and understand the three dates hiding inside every photo.
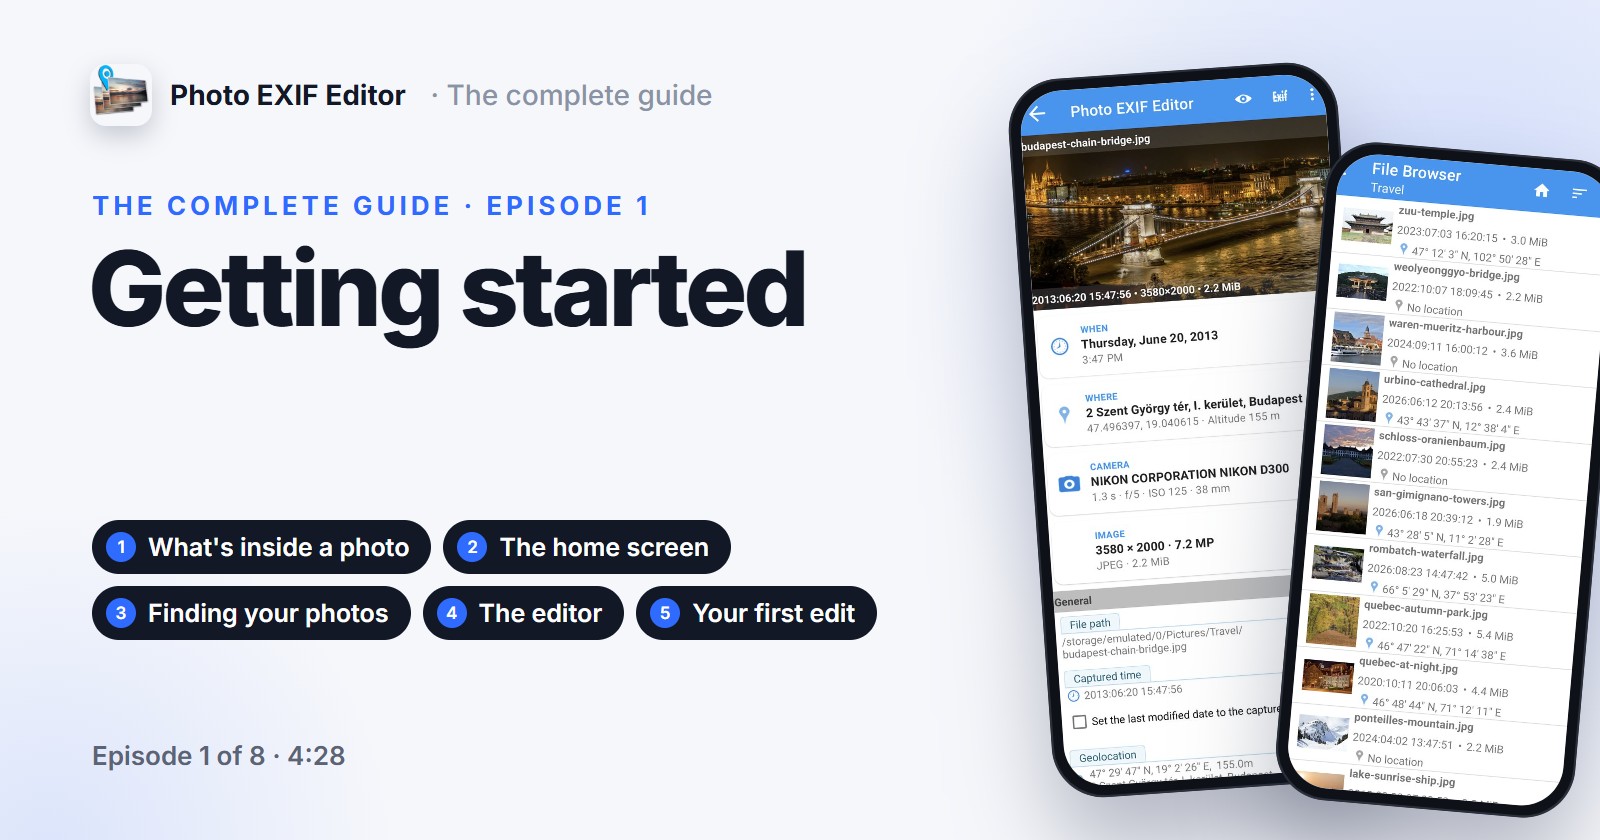
Photo EXIF Editor Guide, Episode 1: Getting Started
The first episode of our video guide to Photo EXIF Editor: what is stored inside a photo, which permissions the app needs and why, the home screen, the File Browser and Android's photo picker, the editor section by section, your first edit, and a few habits that make editing hundreds of photos relaxed.