Photo EXIF Editor Guide, Episode 2: Dates and Times
Episode 2 of our video guide to Photo EXIF Editor fixes the most edited field of all: set an exact date for a scan that has none, shift a photo by an hour when the camera forgot summer time, shift a whole trip by a day in one go, keep file names and the file's own date in step, and understand the three dates hiding inside every photo.
On this page
This is the second episode of The complete guide to Photo EXIF Editor. In Episode 1 we looked at what is stored inside a photo, found our way around the File Browser and the editor, and made a first edit. This episode is about the field people edit more than any other: the captured time.
By the end of it you'll be able to give a photo an exact date, move a date forward or back by any amount, apply the same shift to a whole trip at once, keep file names and the file's own date in step with the photo, and understand why two apps can show different dates for the same picture.
Watch the episode above, or read on.
Why dates go wrong
A photo's date is only as good as the clock that wrote it. The usual suspects:
- The camera's clock was wrong. It was set once, years ago, and never checked. Many cameras also reset their clock when the battery is left out for a while.
- Daylight saving time. Phones switch automatically; most cameras don't. Every photo from a summer trip is an hour off.
- Travel. You flew to another time zone and the camera stayed on home time. The photos are right in order but wrong on the clock, and your gallery may file an evening in Tokyo under the next morning at home.
- Scans. An old print scanned today carries today's date, which is why family archives end up with grandparents' weddings filed under this year.
- Two cameras. A phone and a camera from the same day disagree by a few minutes, and the photos interleave in the wrong order.
All of these are quick to fix, and most of them can be fixed for a whole folder in one go.
The Edit captured time window
Open a photo in the editor and tap Captured time in the General section. The Edit captured time window opens. Its title shows the date the photo will have as you make changes, so you always see the result before you confirm. The window has two modes, chosen with the two buttons under the title: Set date and Shift by.
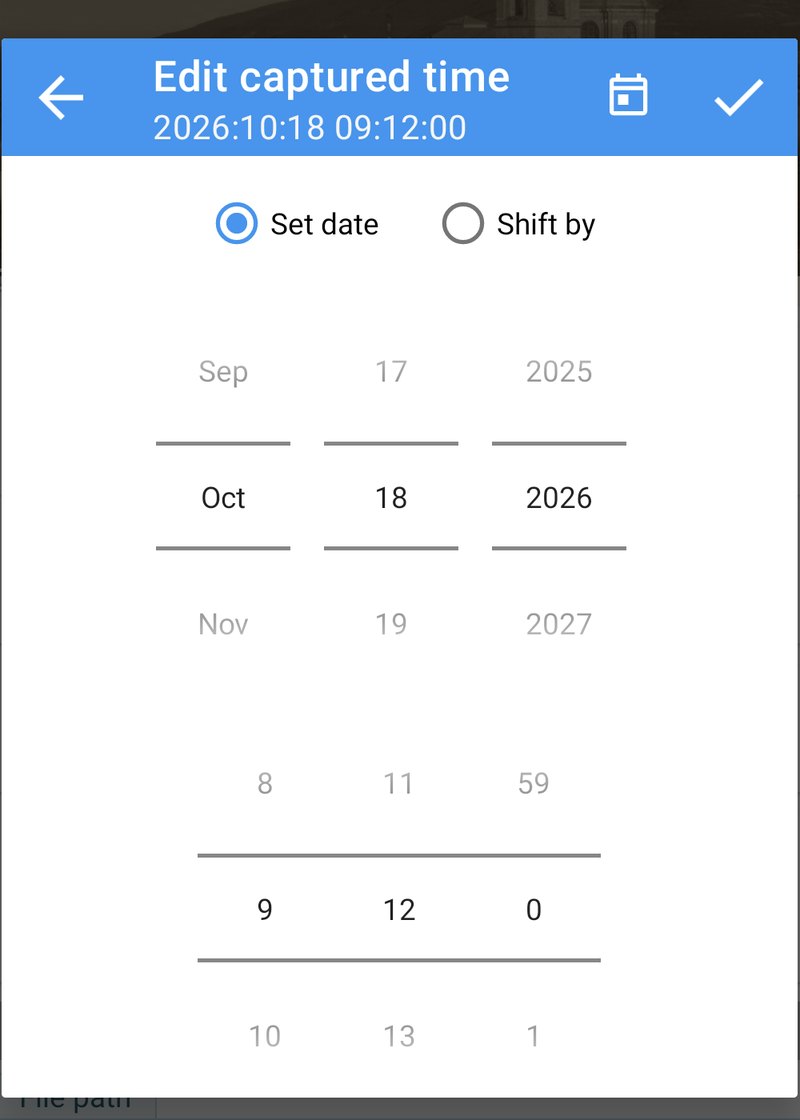
The Now button in the toolbar sets the date to the current moment, which is handy for a photo you've just scanned or received. The check mark confirms. Confirming closes the window but doesn't write anything yet: as everywhere in the app, nothing is written until you tap Save in the editor.
Set date: an exact date and time
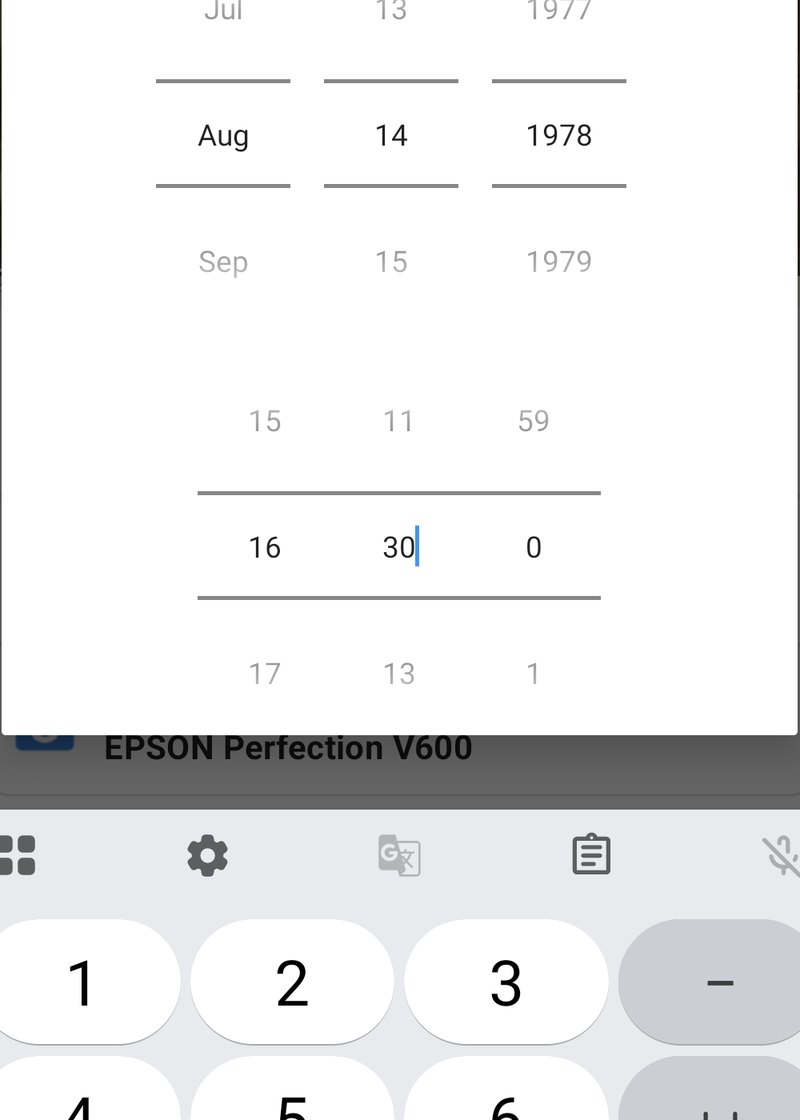
Set date gives the photo a new date and time. Scroll the month, day and year, then the hours, minutes and seconds. You can also tap a value and type it. Confirm with the check mark, then tap Save.
Use Set date when the photo has no date at all, or a date that is simply wrong, and you know when it was really taken. In the video we take a scan of a print from Urbino that carries the date it was scanned and set it to the summer of 1978. From then on, the gallery files it in 1978, where it belongs, and the scan takes its place among the other photos of that year.
Shift by: move the date by an amount
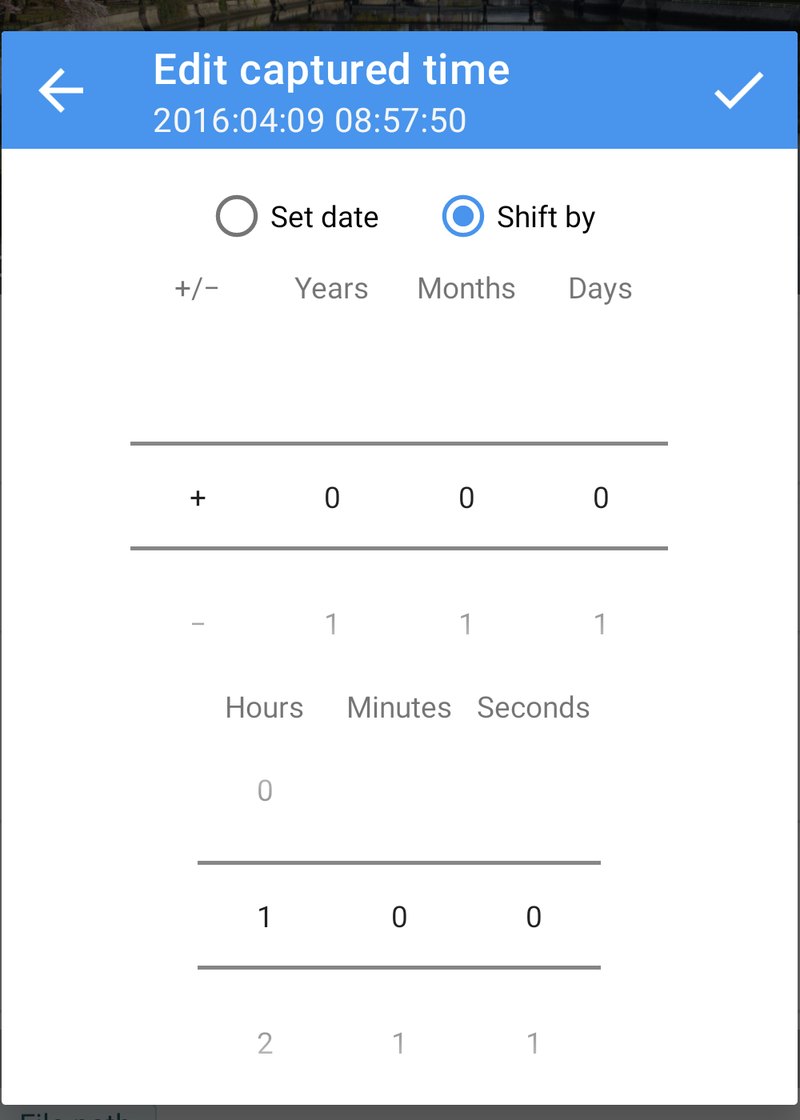
Shift by moves the date forward or backward by an amount, keeping everything else. Choose + or −, then set the years, months, days, hours, minutes and seconds to shift by. The title shows the new date before you confirm.
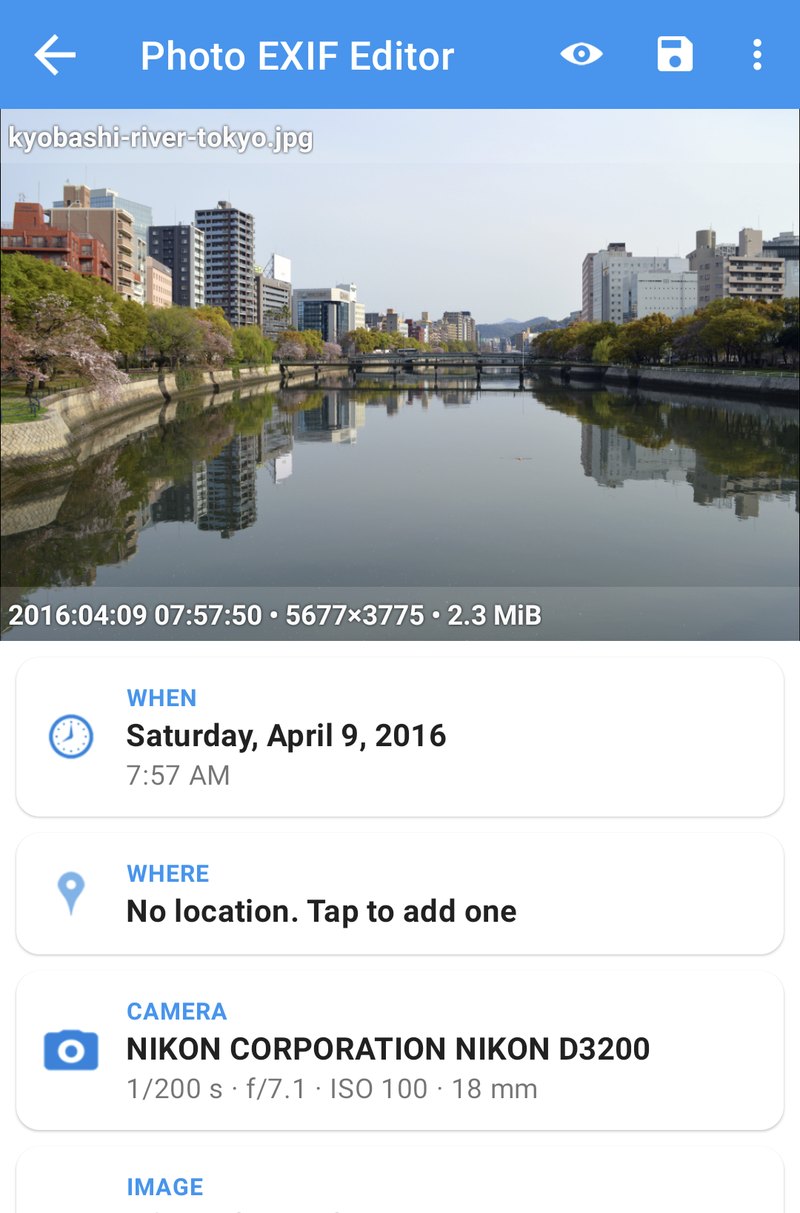
Our photo of the Kyobashi river in Tokyo says 18:41, but the camera hadn't been moved to summer time, so it was really 19:41. A +1 hour shift fixes it:
Shifts follow the calendar the way you'd expect:
- Months and years follow the calendar, so +1 month moves 15 March to 15 April, and +1 year moves 29 February to 28 February.
- Hours, minutes and seconds are exact. +1 hour is always one hour, even across a daylight saving change.
- Shifts across midnight, the end of a month or the end of a year are handled for you. −1 day on 1 March gives 28 (or 29) February.
When you save, the app updates all three date fields that cameras write (the date the photo was taken, the date it was digitized, and the date it was last modified), so every app that reads the date sees the same one. More on those three dates below.
Shift a whole trip
This is the best use of batch editing, and the reason many people install the app. Imagine the camera's clock was one day ahead for a whole trip.
- In the File Browser, open the trip's folder and tap Select all (or tick the photos you want).
- Tap Edit (the pencil). The editor opens with all of them. Fields that differ between the photos show Multiple values.
- Tap Captured time, choose Shift by, and enter −1 day.
- Confirm. Until you save, the captured time shows the shift you chose, for example Shift −1d.
- Tap Save.
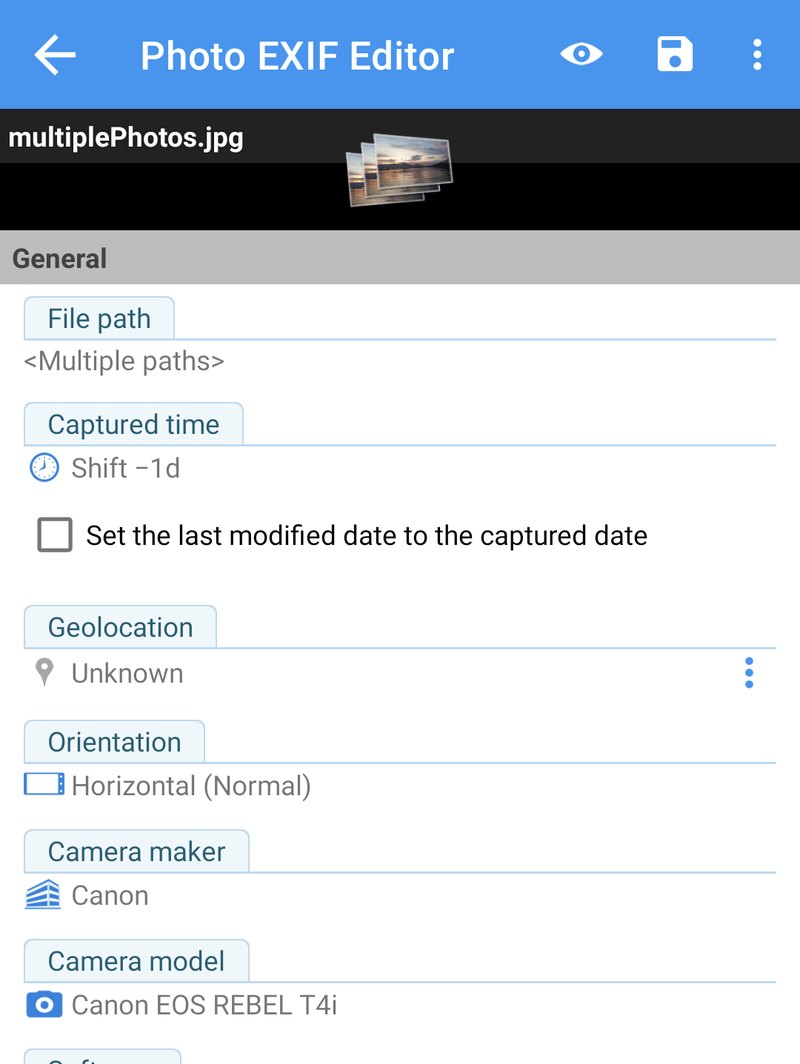
Each photo keeps its own time and is moved by the same amount: a photo taken at 09:14 on the 12th moves to 09:14 on the 11th, and one taken at 09:48 moves to 09:48 on the 11th. The order of your photos and the gaps between them stay exactly as they were. Photos without a captured date are left unchanged, because there's no date to shift.
You can shift hundreds or thousands of photos at once. The saving window shows each photo's progress. If some photos belong to other apps and you haven't granted Manage media, Android asks you to allow the changes, in groups of up to 2,000 photos; the Request permission button in the saving window opens the confirmation. Batch editing in general, including large batches and permissions, is the subject of Episode 4.
Two cameras, one timeline
The same tool merges photos from two cameras into one timeline. Find a moment both cameras photographed, compare the two captured times, and shift one camera's folder by the difference. If the phone says 14:05:10 and the camera says 14:02:40 for the same shot, shift the camera's photos by +2 minutes 30 seconds. Done folder by folder, a week of photos from two cameras falls into the right order in a few minutes.
Rename file: keep date-based names in step
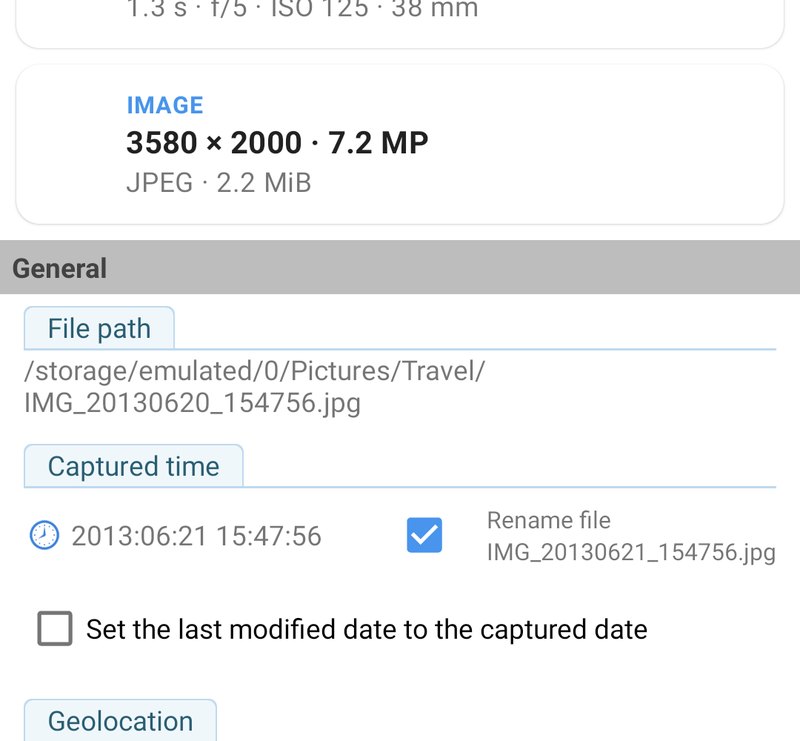
Phones and many cameras put the date in the file name: PXL_20250921_225804.jpg, IMG_20150302_100000.jpg, 20240812_173015.jpg. When Photo EXIF Editor recognises the pattern, a Rename file option appears under the captured time once you've changed the date. Tick it, and the file is renamed to match the new date when you save, so file names and dates stay in sync and sort correctly everywhere, even in apps that only look at names.
The file's own date
The captured time lives inside the photo. Separately, every file also has a last modified date kept by the phone's storage. That date is what file managers show, what some gallery apps and cloud services use to sort, and it changes every time a file is copied or saved.
Tick Set the last modified date to the captured date in the General section to make both agree when you save. Do this when your gallery or your backup app insists on sorting by the file date; it's also a good idea for scans, so that the file is dated like the photo, not like the day you scanned it.
Time zones
When you change a date, Photo EXIF Editor also saves the time zone offset with it, such as +09:00 for Tokyo or −05:00 for Chicago in summer. This tells apps how far from UTC the camera's clock was, so a gallery app can show the photo on the right day even when you look at it from another time zone. The app uses the phone's time zone; if you're fixing photos from a trip to another zone, set the dates while the phone is in that zone, or simply check how your gallery shows them afterwards.
The dates inside a photo, explained
If you've ever wondered why two apps show different dates for the same photo, it's because a photo can carry several dates, and each app picks the one it trusts most:
- Date and time original is the moment the shutter was pressed. This is what "captured time" means, and it's the date most gallery apps use.
- Date and time digitized is when the picture was turned into digital data. For a digital camera it's the same moment as the original. For a scan of a film print, it's the day you scanned it, which is why old scans often appear under the wrong year.
- Date and time (sometimes called modified) is when the file was last changed by a camera or an editing app.
- The time zone offsets for each of these say how far from UTC the clock was.
- Outside the photo, the file system keeps the last modified date of the file itself.
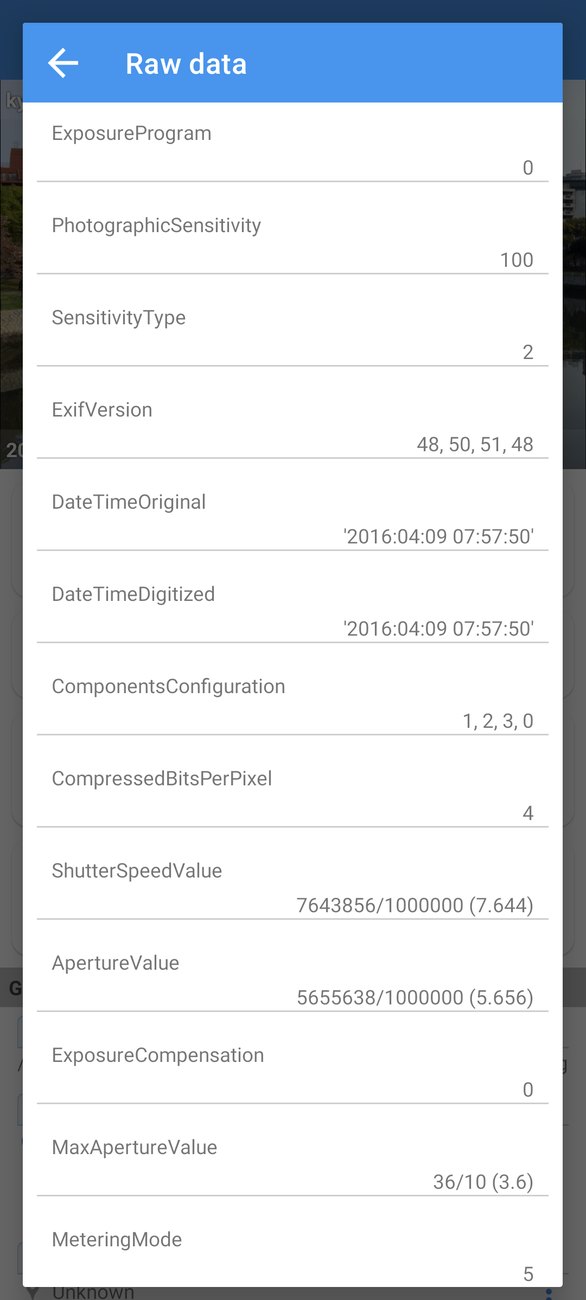
When you edit the captured time, Photo EXIF Editor writes the same new date into the three dates inside the photo, with its time zone offset, so every app agrees. That's almost always what you want. If a photo looks right in one app and wrong in another, open the ⋮ menu, tap Raw data, and compare the DateTimeOriginal, DateTimeDigitized and DateTime tags: the difference usually explains it.
Recipes
The camera was on home time for the whole trip. Select the trip's folder, Shift by the difference between the two zones (for example +8 hours for a trip from London to Singapore), save. Then check one photo in your gallery.
The camera forgot daylight saving time. Select the photos taken during summer time and shift them by +1 hour. Winter photos stay as they are.
An old scan. Open the scan, Set date to the day the picture was taken (or your best guess: the year and month are what matter for sorting), tick Set the last modified date to the captured date, save.
My gallery still shows the old date. Some gallery apps cache dates. Give them a moment, or open the photo once; on a few phones you need to clear the gallery app's cache. If the gallery sorts by the file date rather than the captured date, tick Set the last modified date to the captured date and save again.
What's next
In Episode 3: Locations and geotagging we put photos on the map: search a place or drop a pin in the location editor, switch to satellite view to place a hiking photo exactly, copy a location from one photo and paste it into many, and remove a location before sharing.
The full series:
- Getting started
- Dates and times (this episode)
- Locations and geotagging
- Batch editing
- IPTC and the camera fields
- Templates and Copy EXIF
- The Photo map
- Privacy and the HEIC/AVIF converter
Get the app
- Photo EXIF Editor (free): https://play.google.com/store/apps/details?id=net.xnano.android.photoexifeditor
- Photo EXIF Editor Pro (no ads): https://play.google.com/store/apps/details?id=net.xnano.android.photoexifeditor.pro
The sample photos in this series are CC0 photos from Wikimedia Commons.
Videos
Related app
Photo EXIF Editor
View, edit and remove photo EXIF data and GPS location
Related posts
Photo EXIF Editor Guide, Episode 4: Batch Editing
Episode 4 of our video guide to Photo EXIF Editor is about editing many photos at once: selecting a folder, what Multiple values means, one change written to every photo, shifting a whole trip, large batches of hundreds or thousands of photos, and the permissions Android asks for along the way.
Photo EXIF Editor Guide, Episode 3: Locations and Geotagging
Episode 3 of our video guide to Photo EXIF Editor puts photos on the map: where a location lives inside a photo, adding one by searching a place or dropping a pin, placing a photo exactly on satellite view, copying a location from one photo to many, and removing a location before a photo goes online.
Photo EXIF Editor Guide, Episode 1: Getting Started
The first episode of our video guide to Photo EXIF Editor: what is stored inside a photo, which permissions the app needs and why, the home screen, the File Browser and Android's photo picker, the editor section by section, your first edit, and a few habits that make editing hundreds of photos relaxed.