Headlyx Feature Guide: Every Screen, Mode and Setting Explained
A complete walkthrough of Headlyx — the home screen, all four ways to connect, saved connections, the projection controls, every setting, logs and quick fixes.
On this page
Headlyx shows Android Auto™ from your phone on another screen you own — an Android tablet or a spare phone on the dashboard — or full screen on the phone itself. This guide goes through every part of the app: what each screen does, how each connection mode works, and what every setting changes.
New to Headlyx? Start with the launch article and quick setup, then come back here for the details.

1. The home screen
Everything starts on the home screen. It has four areas (numbered in the picture):
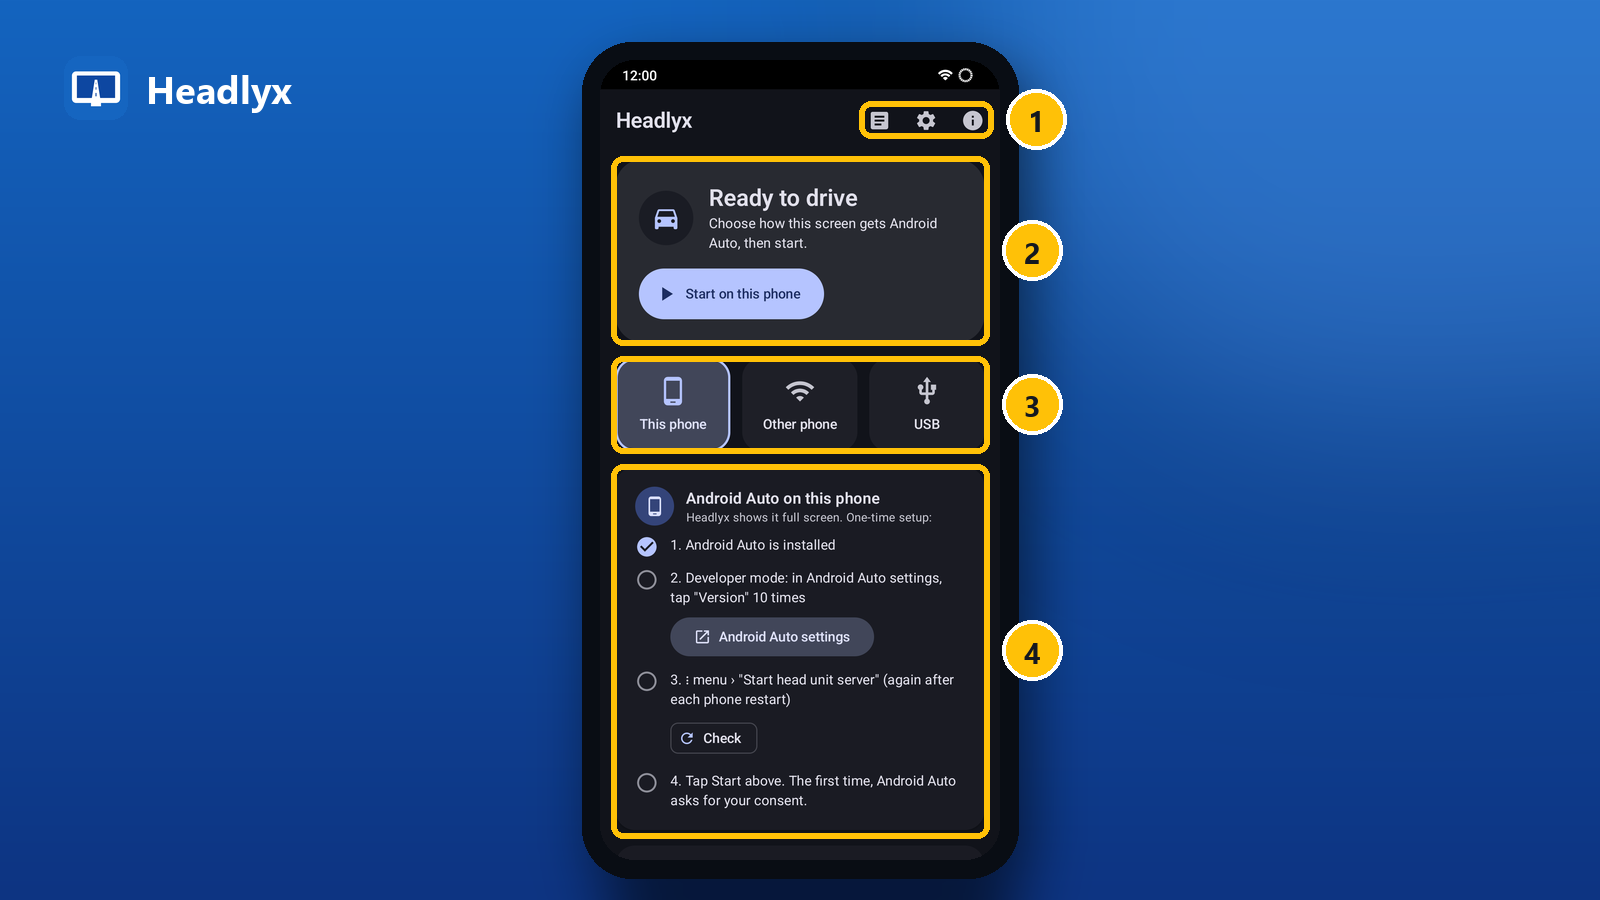
- Top bar — three buttons: Logs (what happened during a connection), Settings and About (version, safety notes, privacy and licences).
- Status card — shows where you are and the main button for the next step:
- Ready to drive — nothing connected yet. The button starts the selected mode (Start on this device, Connect, Connect over USB or Start wireless).
- Connecting… — shows the target and the attempt number.
- Android Auto is on — connected, with the phone's name, address and resolution. Open shows Android Auto full screen, Stop ends the session.
- Reconnecting in N s — the link dropped; Headlyx tries again by itself.
- Could not connect — with the reason in plain words (see Quick fixes below).
- Mode tiles — choose how this screen gets Android Auto: This device, Other phone (Wi-Fi), USB and Wireless β. A tile is greyed out with "(n/a)" or "(no Android Auto)" when the device cannot use that mode — for example a tablet without USB host support, or a device without Android Auto installed.
- The panel for the selected mode — a short checklist with buttons for each step. Steps that Headlyx can check by itself get a tick when they are done.
Below the panel you will find Saved connections (section 6).
2. This device: Android Auto on the phone itself
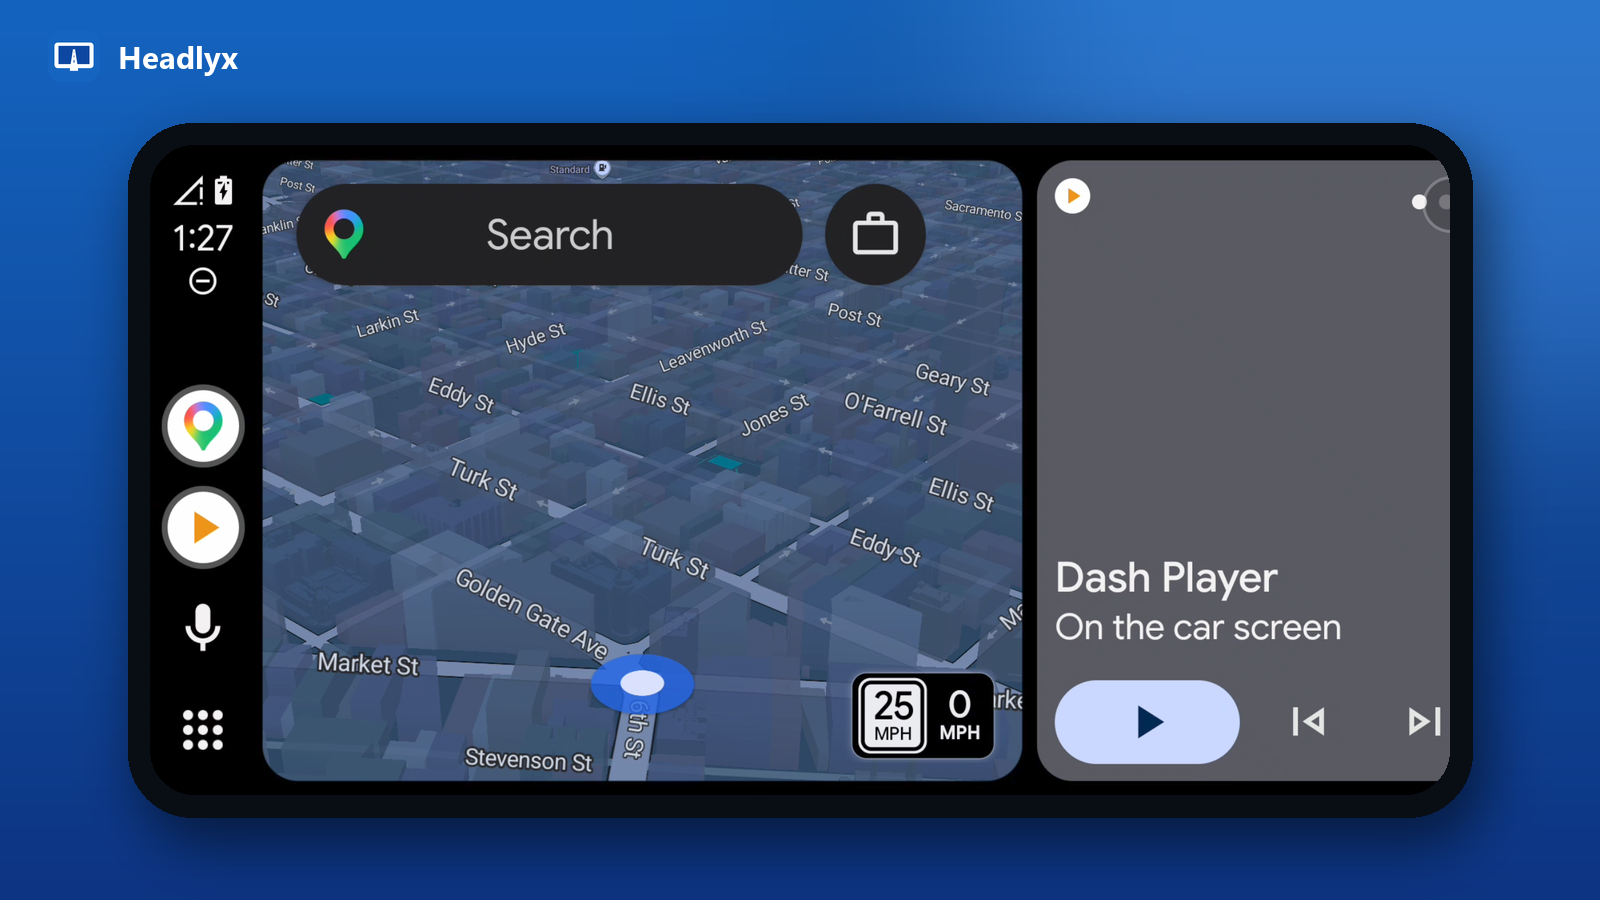
No second screen? This device runs Android Auto full screen on the same phone — handy on a dashboard mount. The panel walks you through a one-time setup:
- Android Auto is installed — ticked automatically.
- Developer mode — tap Android Auto settings to open them, scroll down and tap Version ten times.
- Start the head unit server — in Android Auto's ⋮ menu, choose Start head unit server. Tap Check in Headlyx to confirm it is running. Do this again after every phone restart, or whenever Headlyx says the server does not answer.
- Tap Start at the top. The first time, Android Auto asks for your consent on the phone.
In this mode, media and navigation sound play from the phone itself.
3. Other phone over Wi-Fi
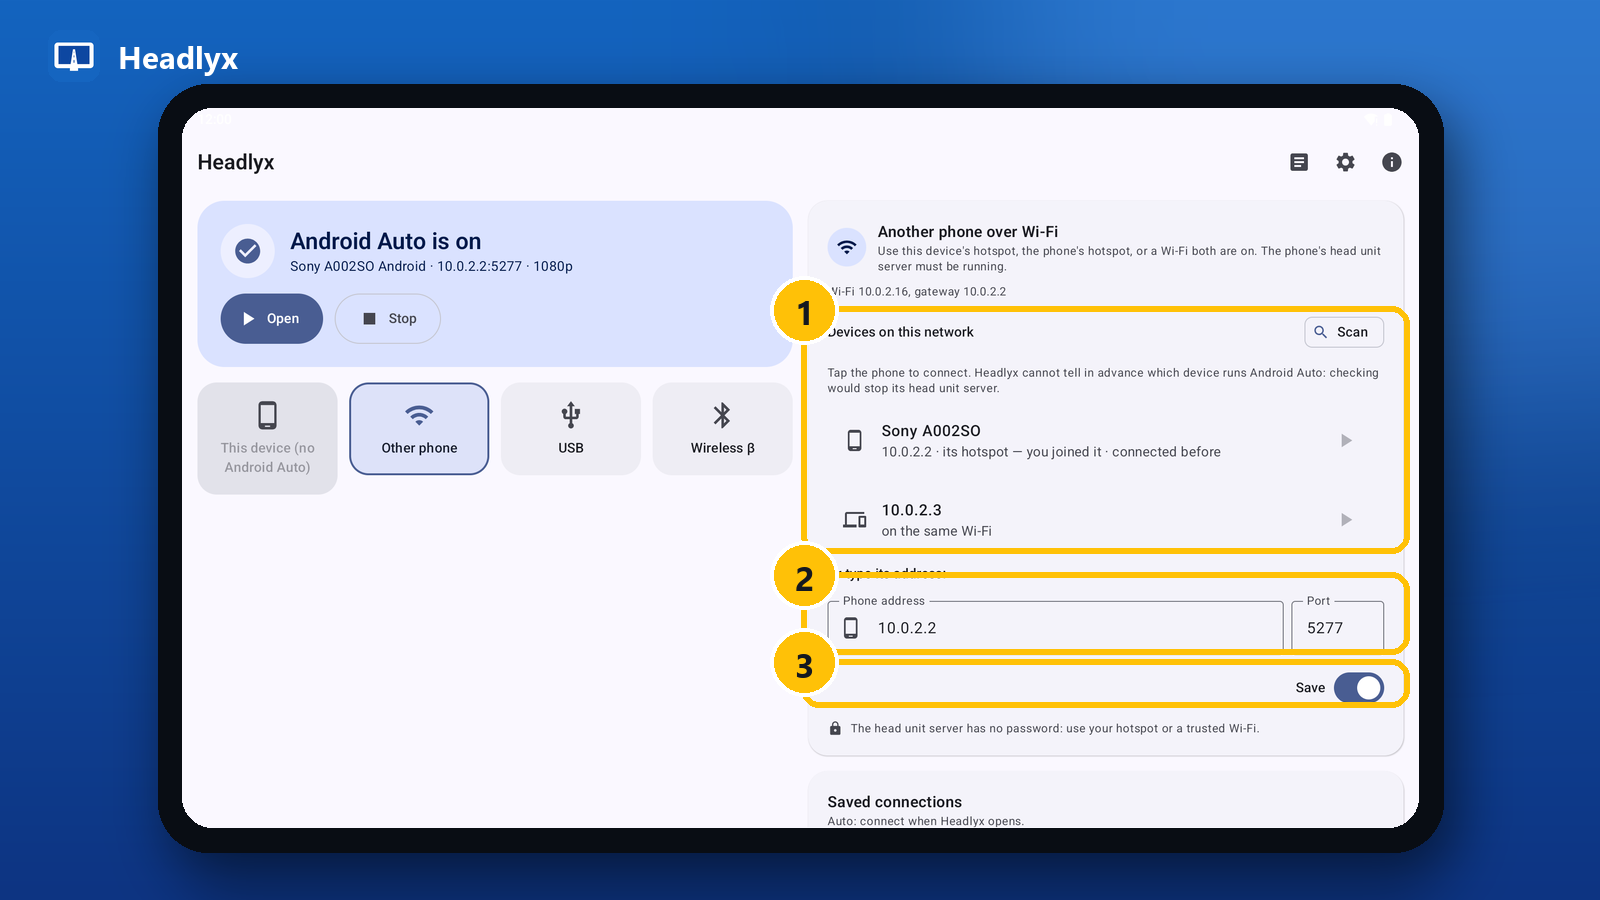
Use this when Headlyx runs on a tablet (or a second phone) and Android Auto runs on your everyday phone. Both devices must be on the same network: the tablet's hotspot, the phone's hotspot, or a Wi-Fi both are on. The head unit server must be running on the phone (steps 2–3 of the previous section, done on the phone).
The panel shows which network you are on (for example This device's hotspot or Wi-Fi … gateway …), then:
- Devices on this network — Headlyx lists the devices that answer. Tap Scan to search again, and tap your phone to connect. Labels help you pick: connected before, likely the phone, or how it is connected (its hotspot — you joined it, on the same Wi-Fi). Headlyx cannot test in advance which device runs Android Auto, because probing would stop the phone's head unit server — so it lets you choose.
- Or type its address — enter the phone's IP address. The port is 5277 (Android Auto's default); change it only if you know you need to.
- Save — keeps this phone as a saved connection, so next time it is one tap away.
The head unit server has no password. Prefer a hotspot or a Wi-Fi you trust, and stop the server from Android Auto's ⋮ menu when you are done.
4. USB cable
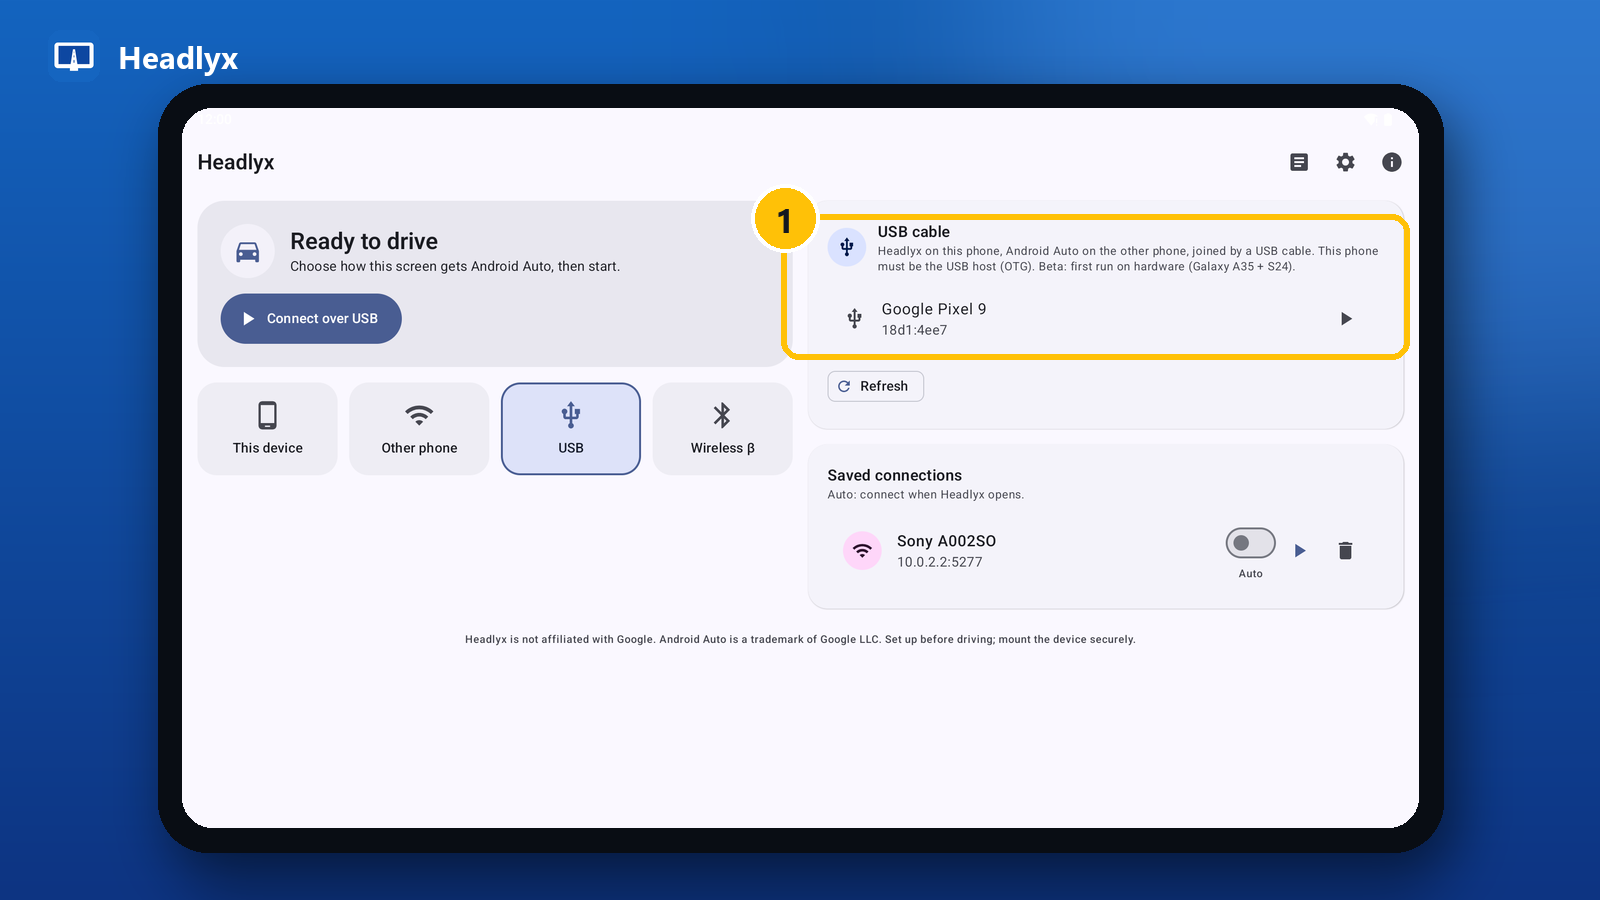
Join the two devices with a data cable — USB-C to USB-C, or an OTG adapter on the Headlyx device. The device running Headlyx must be the USB host (OTG). USB mode does not need the head unit server or developer mode.
- Plug in the phone and unlock it. It appears in the USB cable panel with its name (tap Refresh if it does not).
- Tap the phone, or Connect over USB, and allow the USB permission. Headlyx switches the phone to Accessory mode and Android Auto starts.
If Headlyx says the other phone is in control of the USB link, the roles are reversed. On Samsung phones, open the USB notification on either phone and set USB controlled by so that the Headlyx device controls it — or swap the cable ends, or use an OTG adapter on the Headlyx device.
USB mode is in beta and has been tested on a limited set of phones.
5. Wireless (experimental)
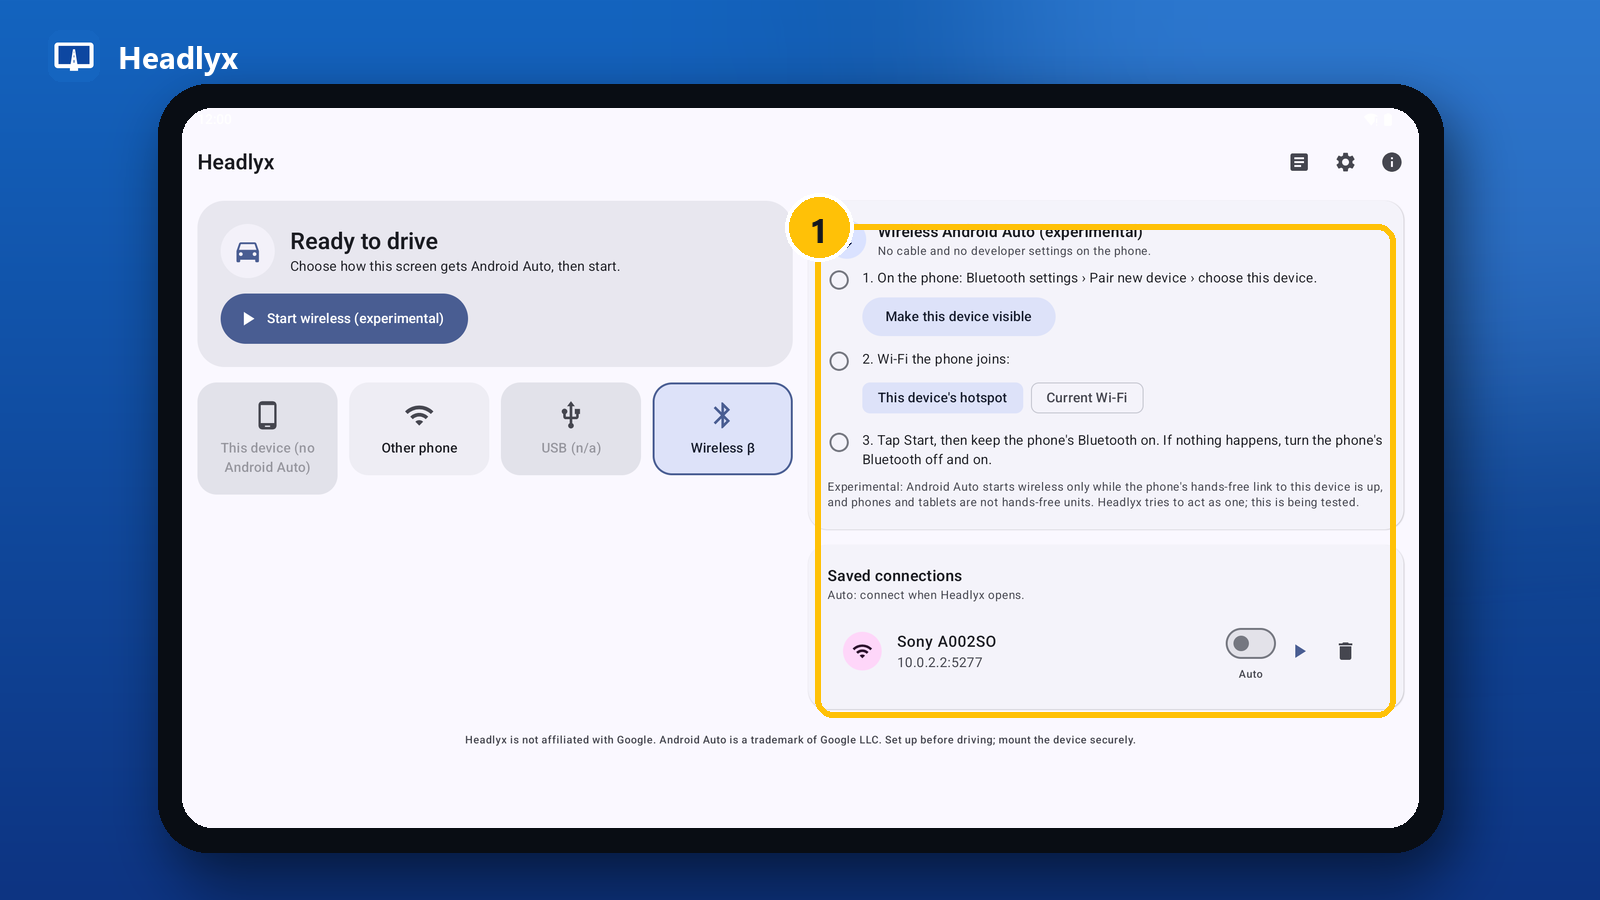
Wireless mode works like a wireless car stereo: no cable and no developer settings on the phone.
- Pair over Bluetooth — on the phone, open Bluetooth settings › Pair new device and choose the Headlyx device. Tap Make this device visible if it does not appear.
- Choose the Wi-Fi the phone joins — This device's hotspot (Android 8 or later) or the Current Wi-Fi (enter its password).
- Tap Start, and keep the phone's Bluetooth on. The status line follows each step: waiting for the phone, Android Auto found this device, the phone is joining the Wi-Fi, and finally phone connected over Wi-Fi.
If nothing happens, turn the phone's Bluetooth off and on. Android Auto only starts wirelessly while the phone's hands-free link to the device is up, and phones and tablets are not hands-free units — Headlyx tries to act as one, and this is still being tested on more devices.
6. Saved connections
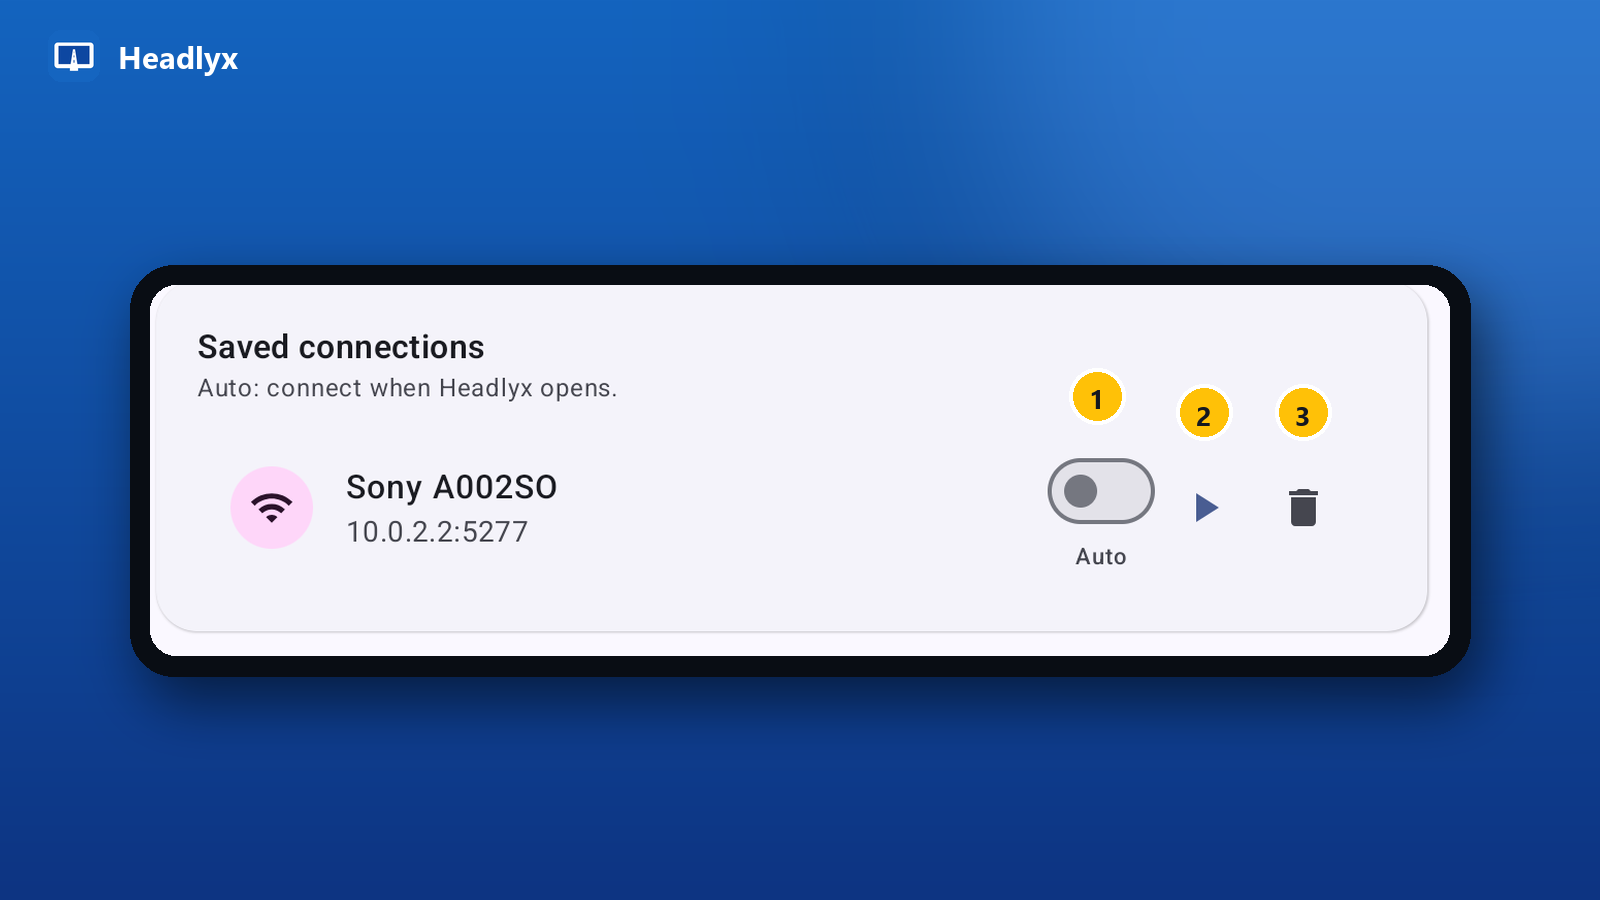
Every phone you save appears under Saved connections, with its name and address. Each one has three controls:
- Auto — connect to this phone automatically whenever Headlyx opens. Turn it on for the phone you use every day, and getting going is simply opening the app.
- Connect (▶) — connect now with one tap.
- Delete — forget this connection.
If a connection drops while driving, Headlyx reconnects by itself — the status card counts down until the next attempt.
7. While Android Auto is on screen
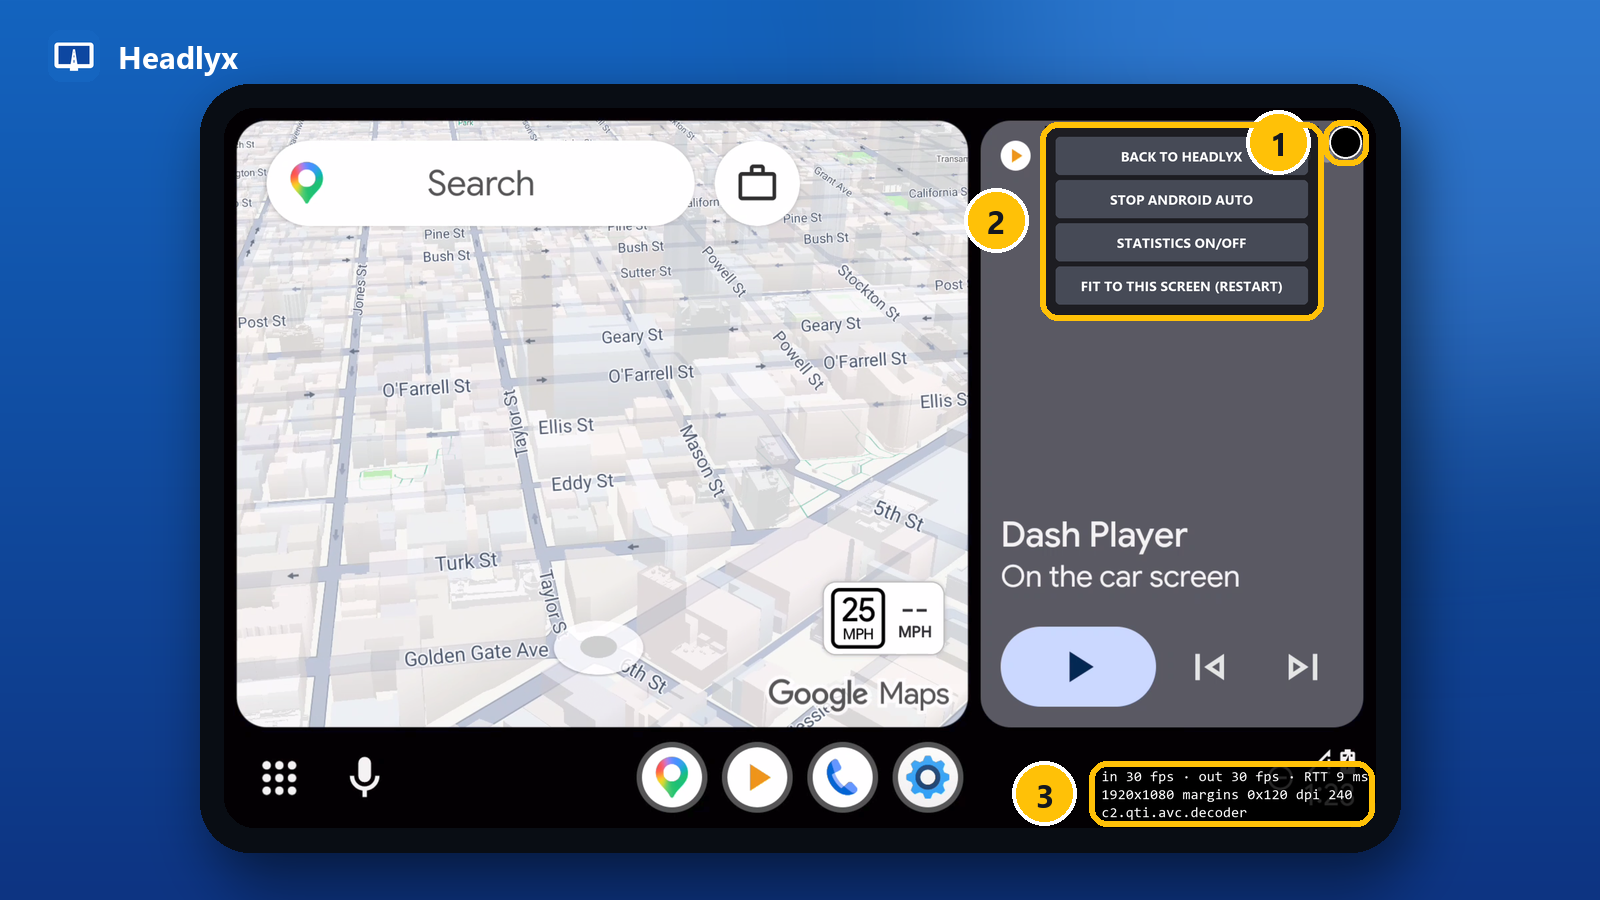
Android Auto fills the screen and reacts to touch as in a car. Headlyx adds only a few controls:
- The round corner button (top right) opens the Headlyx menu. It is semi-transparent so it stays visible on dark and light maps.
- The menu:
- Back to Headlyx — returns to the home screen. Android Auto keeps running; tap Open on the status card to come back. Pressing Back does the same.
- Stop Android Auto — ends the session.
- Statistics on/off — shows or hides the statistics overlay.
- Fit to this screen (restart) — appears only when the window shape changed (for example after rotating or resizing the screen); it restarts the session with the new shape.
- Statistics overlay — frames received and decoded per second, the round-trip time to the phone, the video size and density, and the decoder in use. Useful when you tune the resolution or decoder.
While connected, a notification shows the session ("Connected to …") with a Stop button. You can also tap it to go back to the full-screen projection.
8. Settings
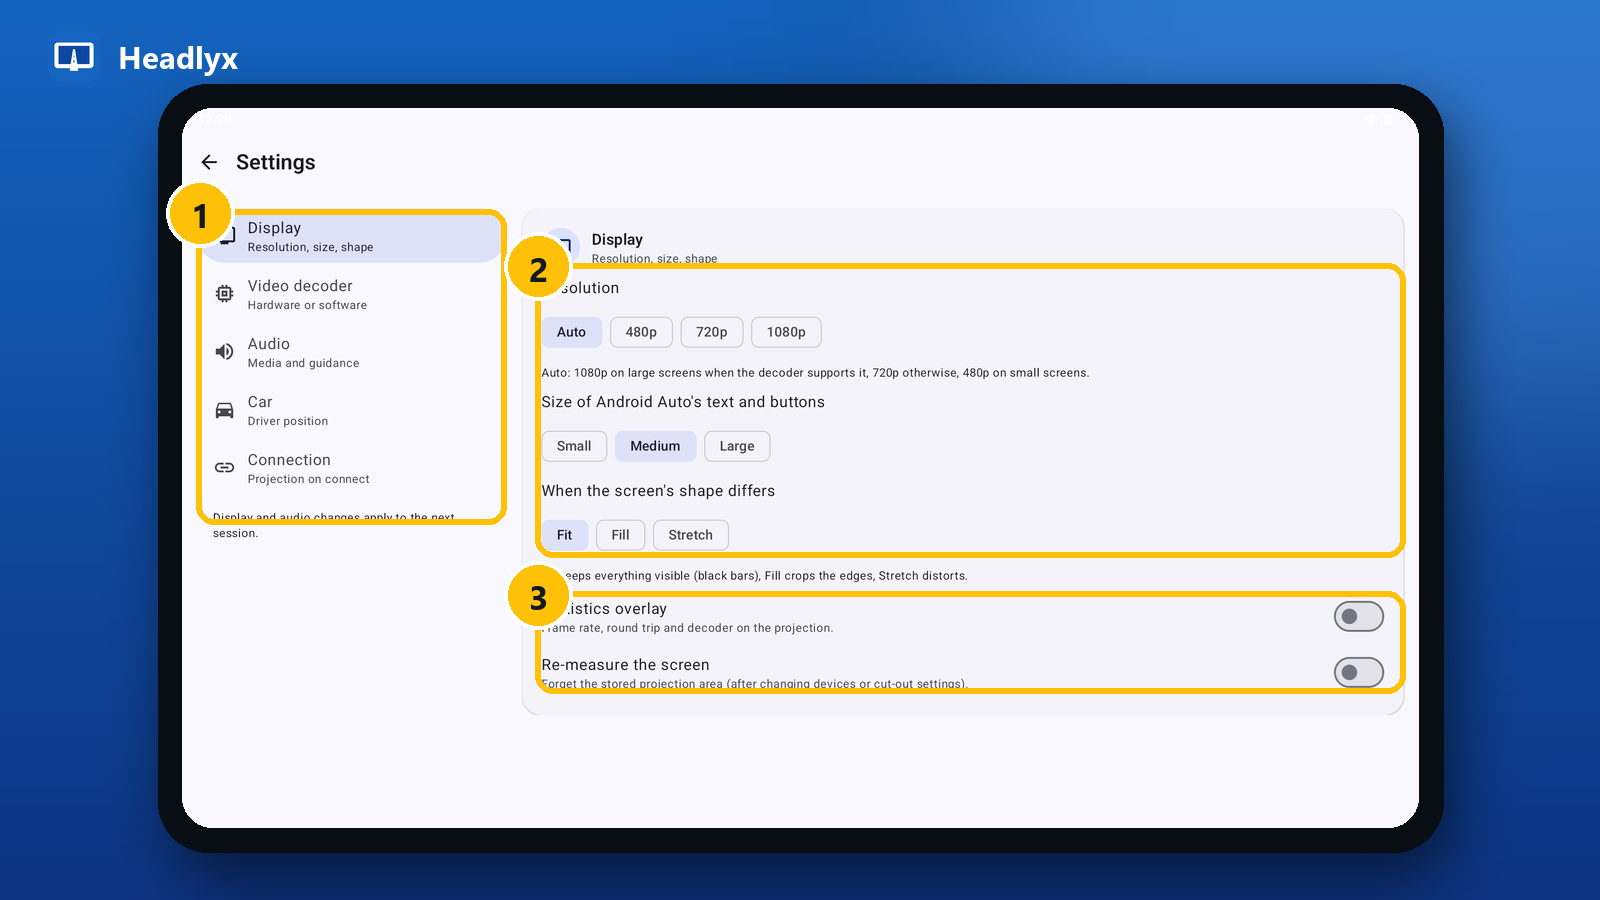
On a tablet, settings are grouped in sections on the left (1); on a phone they are one scrolling list. Display and audio changes apply to the next session, so reconnect after changing them.
Display (2)
- Resolution — Auto, 480p, 720p or 1080p. Auto picks 1080p on large screens when the decoder supports it, 720p otherwise, and 480p on small screens. Lower it if the picture stutters.
- Size of Android Auto's text and buttons — Small, Medium or Large. Small fits more on the map; Large is easier to read at a glance.
- When the screen's shape differs — Android Auto has fixed shapes, your screen may not match: Fit keeps everything visible with black bars, Fill crops the edges, Stretch distorts to fill.
Display tools (3)
- Statistics overlay — the same overlay as in the projection menu; turn it on here to show it in every session.
- Re-measure the screen — forgets the stored projection area. Use it after moving Headlyx to another device, or after changing the display cut-out (notch) setting, if you see black bars or touches land in the wrong place.
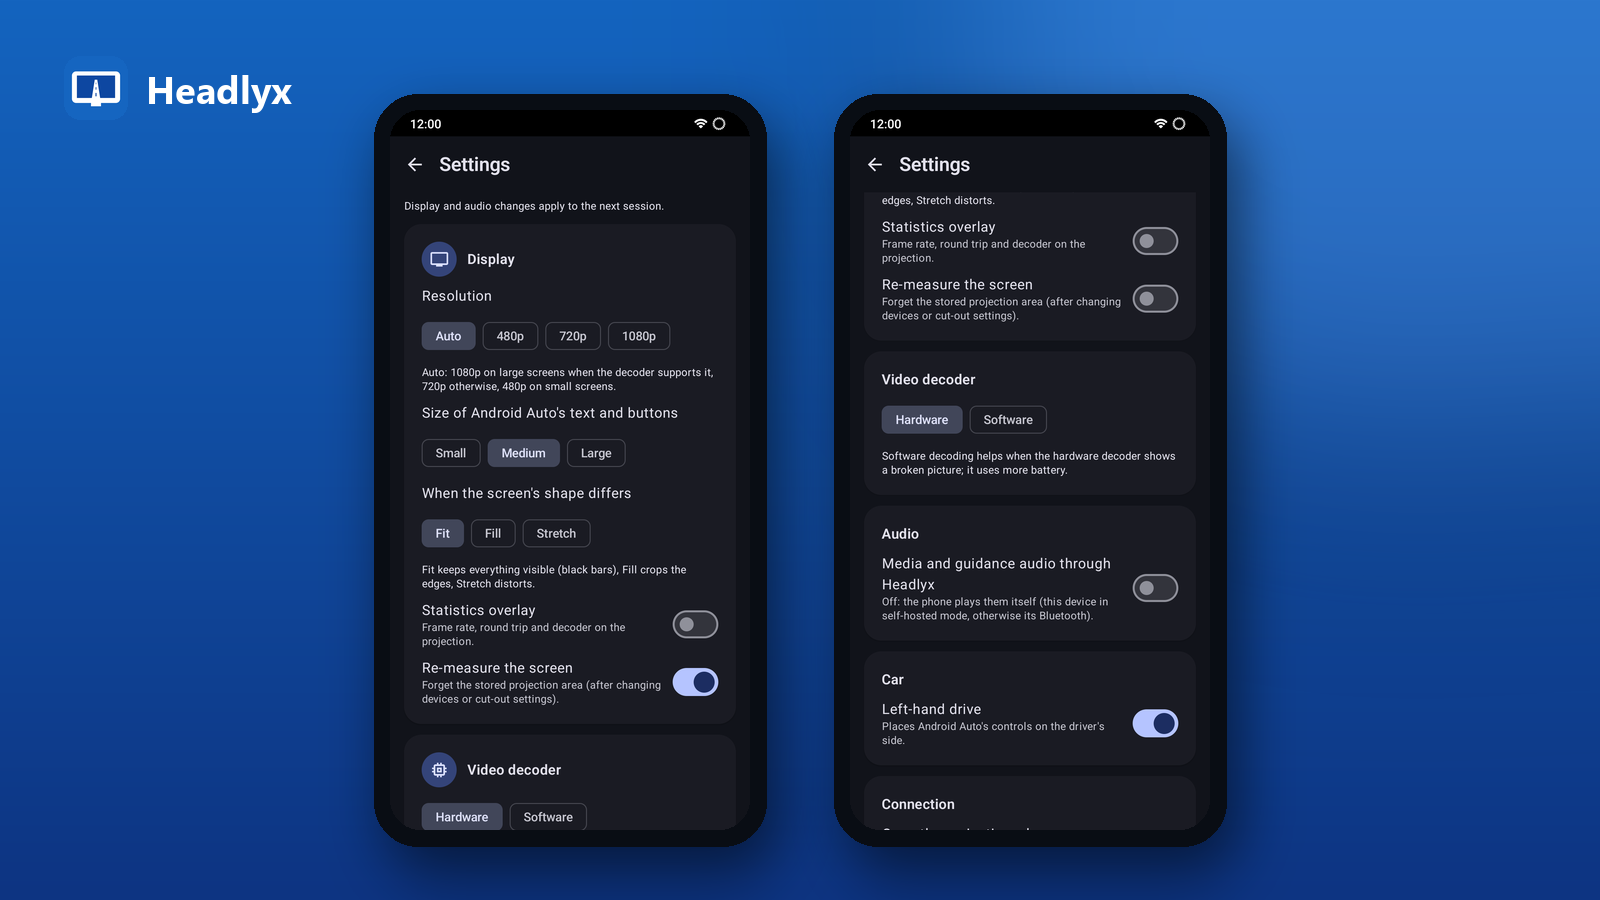
Video decoder
- Hardware (default) — fastest and most battery-friendly.
- Software — try it if the hardware decoder shows a broken, green or frozen picture. It uses more battery.
Audio
- Media and guidance audio through Headlyx — on: music and navigation prompts play from the Headlyx device. Off: the phone plays them itself — on the phone in This device mode, otherwise through its Bluetooth (for example to your car's speakers).
Car
- Left-hand drive — places Android Auto's controls on the driver's side. Turn it off for right-hand-drive cars.
Connection
- Open the projection when connected — shows Android Auto full screen as soon as it connects. Turn it off if you prefer to stay on the Headlyx home screen and tap Open yourself.
9. Permissions, and why they are asked
Headlyx asks for each permission only when a feature needs it:
- Microphone — Android Auto requires it for the voice assistant and hands-free calls.
- Location (optional) — only to tell Android Auto whether the car is moving, so it limits what it shows while you drive.
- Notifications — for the session notification with its Stop button.
- Nearby devices / Bluetooth — only for wireless mode.
- USB — Android asks when you connect a phone by cable.
10. Logs and About
- Logs (top bar) show the connection state, video stream, frames and round-trip time, plus recent events. Export shares a plain-text report you can attach to a support request. Logs contain no screen content and no messages, and they stay on your device until you export them.
- About shows the version, the safety note, the privacy summary with a link to the full privacy policy, and open-source licences.
11. Quick fixes
| What you see | What to do |
|---|---|
| Nothing listens on …:5277 — is Android Auto's head unit server running? | Start the head unit server again on the phone (it stops after a restart). |
| No answer from … or … is not reachable from this network | Check that both devices are on the same hotspot or Wi-Fi, then Scan again. |
| Stuck on Connecting… | Force-stop Android Auto on the phone (Settings › Apps › Android Auto), then start the head unit server again. |
| No phone on USB | Use a data cable, unlock the phone, tap Refresh. |
| The other phone is in control of the USB link | Set USB controlled by to the Headlyx device, or swap the cable ends. |
| Black bars or touches in the wrong place | Settings › Re-measure the screen, then reconnect. |
| Broken or frozen picture | Settings › Video decoder › Software. |
| No sound from the Headlyx device | Turn on Media and guidance audio through Headlyx. |
| Wireless: the phone could not join … | Check the Wi-Fi password, or use This device's hotspot. |
Still stuck? Export the Logs and send them to us with a short description.
Safety
Set Headlyx up before you drive and mount the screen securely. Headlyx tells the phone when the car is moving so Android Auto can limit what it shows. Follow local laws about screens in vehicles.
Headlyx is an independent app, not affiliated with, endorsed or sponsored by Google. Android and Android Auto are trademarks of Google LLC.
Related app
Headlyx: Car Screen Receiver
Use a tablet or spare phone as the car screen for Android Auto™ from your phone.